Frequently Asked Questions
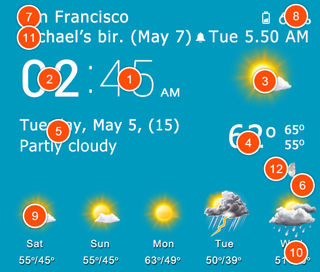
Note that hotspots 7 and 8 apply only to widgets that display the daily or hourly forecast at the bottom. Also note that hot spots 1, 2, and 5 can be changed by the user (from settings, Widget settings, Shortcuts)
The action of each hotspot is the following:
1 - Minutes: Open the application settings
2 - Hour: Launch the default alarm application
3 - Weather icon: Launch the application
4 - Current temperature: Request weather update
5 - Date: Launch default calendar application
6 - Location: Move to the next location (display related time and weather information)
7 - Launch daily or hourly forecast (depending on what type of forecast is displayed on the widget)
8 - Weather forecast: Change weather forecast from daily to hourly and vice versa
9 - Next event: Display information about the current event
10 - Next alarm: Launch the default alarm application
Here is a list of the most important weather symbols that we use and their meaning.
| Precipitation (amount, probability) | |
| Rain precipitation (amount, probability) | |
| Snow precipitation (amount, probability) | |
| Humidity | |
| Wind speed | |
| Wind direction | |
| Dew point | |
| Visibility | |
| Pressure | |
| Wind chill | |
| Feels like | |
| UV index | |
| Temperature | |
| Cloud cover | |
| Sunrise | |
| Sunset | |
| Free internal storage | |
| Free external (SD) storage | |
| Battery temperature |
First, make sure you are using the latest version of the app. We continuously work to fix problems and improve the functionality and we release updates at least once per month.
If the weather on the widget does not update automatically, then it is probably because the app cannot update the weather in the background. Please read below for more information and solutions.
The location and weather on the widget are updated by a task that is scheduled by our app. The task is executed by Android and the requirements are that there is Internet connection available and the phone battery is not low. It is up to Android to execute the task - our app simply schedules the task. If the weather is not updated automatically, then at least one of the following may be happening:
- The app is killed / removed from memory (in this case, everything that is part of the app is also stopped)
- 'Data saver' and our app does not have 'Unrestricted data usage'
- Our app is not allowed to access the Internet while in the background (from system settings)
- Your phone is low on battery
- Your phone has no Internet connection when the screen is off (due to optimizations / settings)
- The weather refresh period from inside the app is set to None
To check if the app is allowed to access the Internet in the background, tap the temperature on the widget and notice what happens - if everything is good, you should feel a vibration and the weather should be updated, otherwise you should see a message at the bottom of the screen saying that the weather cannot be updated.
To make sure that our app can access the Internet for automatic updates do the following:
- Go to 'Phone settings'
- Select Apps
- Choose our app
- Choose 'Mobile data usage'
- Enable 'Background data'
- Enable 'Unrestricted data usage'
Note to Samsung users: If the app is battery optimized, it will not be able to access the Internet in the background. To check and correct this, do the following:
- Launch phone settings
- Choose Apps
- Choose our app
- Choose Battery
- Deselect battery optimization
Once you check the above, try refreshing the weather again and let us know if you have any more problems.
If the problem is number 1, you can check the following page for common solutions for specific devices. https://dontkillmyapp.com/
Make sure that the location settings are set correctly. Check the details below:
1. Enable Automatic Location in the App:
- Open the app.
- Go to Settings > Weather & Location Settings.
- Ensure that the 'Use my location' option is checked.
- Exit the app, remove and add the widget on your home screen.
Location and weather updates are handled by a scheduled background task. Android may postpone these jobs to save battery. Ensure the app is allowed to run in the background and isn't restricted by any power-saving settings.
2. Disable battery Optimization (Samsung Users):
- Open Phone Settings > Apps > [Our App] > Battery.
- Disable battery optimization.
- For more solutions and other devices, visit: https://dontkillmyapp.com/
3. Verify Phone Location Services:
- Open your phone's settings.
- Locate Location or Location Services and enable it.
- If available, set your preferred accuracy mode.
4. Check App Location Permissions:
- Open Phone Settings > Apps > [Our App] > Permissions.
- Ensure location access is granted "All the time" (especially if you use only the widget).
5. Enable unrestricted Data Usage:
- Open Phone Settings > Apps > [Our App] > Mobile Data Usage.
- Enable Background Data and Unrestricted Data Usage.
Our app schedules a task with Android at the top of each hour so that it can play the hourly beep. However, sometimes the beep might not happen exactly on time because your phone's system tries to save battery by delaying certain tasks. Instead of running tasks right away, it may wait and run them all together later. This is something the phone's system controls, and we can't change it.
To help the beep work more reliably:
- Make sure your phone is well charged.
- Try not to have too many apps running in the background, as this can cause further delays.
Special Tips for Users of Xiaomi Redmi Note 13 Pro (or similar devices):
If you're using a Xiaomi Redmi Note 13 Pro, your phone has extra settings to save battery, which might stop the beep from working on time. Here's how to fix this:
- Open Settings, go to Battery, and turn off Battery Saver.
- In Settings, find the app in the list of installed apps, tap on it, and make sure it's allowed to run without restrictions.
- Keep the app open in the background by locking it in your recent apps menu.
This is happening because our app cannot get any valid subscription information from Google Play services. Each time the app is opened, it checks with Google Play to verify if the current user (the Google Play account you're signed into) has an active subscription. If Google Play confirms a subscription, premium features are unlocked (ads are removed, and premium options are activated). However, if Google Play doesn't report an active subscription, the app will remain in free mode.
There are a few scenarios where Google Play might not recognize your subscription, and this is not necessarily caused by our app. Please try the following steps, and if they don't resolve the issue, we're here to assist you further.
Steps to Resolve the Issue:
1. Restore Purchases: Open the app, go to the left-hand menu, and select "Restore Purchases". This action often resolves the issue by prompting the app to re-check for any active subscriptions.
2. Check Your Google Account: If you've changed or reset your device, ensure you're signed in with the same Google account you used for the original purchase. If you're using a different email address, Google Play won't recognize your subscriptions or purchases.
3. Verify the Correct Google Play Account: If you have multiple Google accounts, it's possible that the default account on Google Play isn't the one linked to your purchase.
- Switch to the correct account in Google Play
- Open the Google Play Store app on your device.
- Tap on your profile icon in the top-right corner of the screen.
- You will see a dropdown with your Google accounts. Tap on the arrow next to your account name or email address.
- From the list of accounts, select the account that you used to make the purchase (the correct one linked to your subscription).
- Once switched, go back and follow the steps to force-stop both Google Play and the app, then restart them.
- Force-stop Google Play and restart it
- Force-stop our app and restart it
- After restarting both, check if the issue is resolved
4. Allow Google Play to Run Continuously: Ensure that Google Play is allowed to run in the background at all times:
- Open your phone's Settings.
- Navigate to Battery Settings and confirm that Google Play is not restricted from running automatically.
- Some phones have settings to prevent apps from being stopped – if applicable, make sure Google Play is permitted to run without interruption.
5. Check Subscription Status: Ensure that your subscription hasn't been paused:
- Open Google Play.
- Tap your profile icon in the top-right corner.
- Select Payments & Subscriptions, then Subscriptions.
- Find your subscription to our app.
- If the subscription is paused, tap Resume to reactivate it.
Reset Google Play Services and Google Play: If the issue persists, try resetting Google Play Services and Google Play:
- Open your phone settings.
- Go to Apps and select Google Play Services.
- Choose Storage and tap Clear Cache followed by Clear Storage (or Clear Data).
- Repeat the same steps for the Google Play app.
- Restart Google Play, exit, and then restart our app.
- If needed, force-stop our app once again and restart it.
Reinstall the App: If none of the above steps resolve the issue, try uninstalling and reinstalling the app. This can help clear any potential issues with installation files and ensure the app is working with the latest updates.
You can manage subscriptions from the Google Play app. You can cancel, pause and resume subscriptions among other things.
- Start the Google Play app
- Tap on your profile icon at the upper right corner
- Choose 'Payments & subscriptions'
- Choose 'Subscriptions' - once you do that you should see a list of all purchased or subscribed apps
- Choose the item you would like to cancel, choose 'Cancel subscription' and confirm
If you encounter an aggressive or difficult-to-close ad, you can report it by tapping the small icon (such as "AdChoices" or a close [X]) typically located in a corner of the ad. This will provide options like "Stop seeing this ad" or "Report this ad," depending on availability.
Displaying ads allows us to offer the app for free and cover operational costs. For an ad-free experience, please consider our premium version.
Try to resize the widget:
- Long-press the widget on your home screen.
- Look for a "Resize" option (usually indicated by borders or handles around the widget).
- Adjust the widget back to 4x2 by dragging the borders.
If resizing is not available, you may need to check your home screen grid settings in your device or launcher settings and adjust the grid size (e.g., to a larger grid like 5x5).
It's important to remember that weather apps provide data based on weather stations, which may be several kilometers away from your exact location. The information shown as "current" may also be up to 30 minutes old due to data updates.
For more accurate, up-to-the-minute information, we recommend checking the hourly forecast. The true value of a weather app is helping you plan for what's coming in the next few hours or days. While current conditions can give you an idea, they are often based on nearby weather stations and may not perfectly reflect the weather outside your window at that moment.
In short, the app is designed to give you the best possible forecast for the future, rather than exact real-time data for your specific location.
Rest assured that we did not initiate any payment on our end, as developers are unable to do so. We strictly adhere to Google Play's guidelines for subscriptions and ensure full compliance. Below, I've outlined some possible reasons why you may have been charged unexpectedly. You can also contact Google Play directly to verify this.
If you did not intend to subscribe, we'd be happy to issue a full refund. To process this, we'll need either the order number or the email address associated with your Google Play purchase. If you're unsure of these details, Google Play support can assist you in retrieving them.
For clarification, here is how the subscription process works in our apps:
- Subscription Page: We display a subscription page in line with the latest Google Play guidelines, showing clear information about the services, trial period, subscription terms, payment details, and cancellation process.
- Google Play Confirmation: If you choose a subscription plan, you are shown a Google Play confirmation page, which again includes all relevant purchase details.
- Password Prompt (if applicable): If you confirm the purchase with the Google Play popup and your phone is not set to remember your password for payments, you'll be asked to enter your password to confirm the transaction. If your phone is set to remember your password, the purchase will proceed.
If you were charged for one of our products and are unaware of how it happened, one of the following scenarios may apply:
- Someone else used your phone and initiated the subscription or purchase.
- You started a free trial, and the trial period ended without cancellation, resulting in an automatic charge (as explained in step 1).
To check the status of your subscriptions, you can open Google Play, go to the menu (by clicking your profile picture), and select "Subscriptions."
The application launches the default clock.alarm application when the hour hot spot (the hour on the widget) is clicked (provided that you have not specified a custom application to be launched).
If the default hour hot spot action does not work, please read below to set the hot spot manually.
Check if your phone has a built-in alarm application (sometimes, it comes with the standard Clock application). If not, you can download any alarm application from the Google Play website. Then follow the steps below to set-up the hour hot spot and let me know if you have any more problems.
- Launch the app
- Go to settings
- Choose Widget settings
- Choose Shortcuts
- If the Default hour action option is not selected, select it, go back to the widget and test the hour hot spot again.
If the above does not work, do the following
- Launch the app
- Go to settings
- Choose Widget settings
- Choose Shortcuts
- Deselect the Default hour action option
- Tap Select hour action and from the list of applications that pops up, select the desired alarm application
1. Make sure that all settings under settings, Widget settings, 'Next event' are set correctly.
2. Check that the app has permission to access your calendar by doing the following:
- Go to phone settings
- Choose Apps
- Select our app
- Choose Permissions
- Choose Calendar
- Select 'Allow'
3. Make sure that there is at least one event in the selected period. If you choose to show events in the next 7 days and there is an event coming up in 8 days you will not see any events on the widget.
4. In case the 'Exclude all-day events' option is checked and the only event in the selected period is an all-day event, you will also not see any event on the widget.
5. Launch the Google calendar and make sure that events are not disabled for the calendars you want to use
If you still have problems, remove the widget and add it back. Also try to add the Calendar widget (that displays more than one widgets) and see if that works.
If everything fails, try to reset the app (phone settings, Apps, choose our app, Storage, Clear data) and set it up again. Note that this will clear all your settings.
To change the language do the following:
- Launch the application and choose settings from the left sliding menu (the option with the Gear icon)
- Select Advanced settings (the third option from the bottom)
- Select Language (the first option)
- Choose the language you want
Note that if your phone language is set to the language you want, choosing Default from the language list above (step 4) should set the application to the system/phone language
This happens when the high contrast text option is switched on from phone settings. This enforces a fixed color on all text so that text is more readable, however this causes custom colors on the widget to be ignored.
To fix this do the following:
- Go to phone settings
- Choose Accessibility
- Deselect the "High contrast text" option
Both versions, the free and ad-free (or Pro) version, include the same functionality, however the Pro version does not show ads. The Pro version can be installed with a one-time (lifetime) purchase, currently $10.99 (price varies depending on the location).
Both versions support an optional subscription to premium (these prices vary depending on the location). The premium upgrade removes all ads (from the free version) and includes the following premium features:
- Animated weather radar
- Air quality forecast
- Hurricane tracker
- Severe weather alerts
- 60 minute forecast
- Access to all animated weather backgrounds
- Access to all premium icons
- 3 day (72 hour) activity forecast for any location
If you just want to remove the ads then the Pro version is the best choice since you only pay once. If you are interested in the premium features however, the free version with the premium subscription is the best choice. You can try out the Premium version for free for 3 days using the free version - remember to cancel the subscription before the end of the trial so that you will not get charged.
This happens when a 3rd party application prevents our app from accessing the Internet (or specific servers on the Internet). Check the following list and make sure that none of the following is causing a problem with Internet connection. If it is, disable it (or exclude our app from being restricted).
- An antivirus (or similar) software that blocks Internet addresses
- A VPN or proxy software
- A DNS application that can enable Private DNS mode
- A bad Wifi connection (try connecting to a different Wifi hotspot or turning Wifi off and using mobile data)
Comparing the current forecast between two or more weather providers is not the way to check if an app is accurate. Any differences in the current temperature between two apps or websites can be caused because different weather stations and different caching periods are used. The current conditions are based on the conditions at the weather station, at the time the weather is requested - also, since the weather data is cached (to prevent server overload issues and excessive charges), the time that the data is obtained can be up to 15 or more minutes old.
Therefore, differences can exist between any two applications. The best way to check the accuracy of a weather forecast app is to check the hourly and daily forecasts. The current conditions show the current situation at the weather station that is used for the selected location. If a weather station covers an area of a radius of 5 kilometers or more, it is possible that the weather condition at one side of the radius is different than that of the opposite side and that at the weather station (see Location 1 and location 2 on the image below). Also, if a location is covered by two weather stations or more, the current conditions can be different, depending on which weather station is being used for that location - see Location 1 which is covered by Weather station 1 (currently no precipitation) and Weather station 2 (currently with precipitation).
Our widget asks the Android system for the next scheduled alarm (using a system function in Android) and displays the value it receives. If the next alarm time reported is wrong, then you are either using a 3rd party alarm app that does not use the Android alarm registry or some other application is setting a system alarm (in order to execute a task at a specific time) - Android picks up that time and reports it to our widget which in turn displays it as the next scheduled alarm time. Note that it is possible for other apps to schedule private / hidden system alarms that do not appear under the list of regular alarms - the system still considers them as scheduled alarms.
Users of Samsung devices
- On some Samsung devices, when you set a calendar event, an alarm may be set for that event, automatically or manually. In that case, our widget will show that event. This may be happening with other calendar apps as well. You can check and disable alarms that are set by calendar apps.
- If you are using Bixby routines, this can cause a problem since Bixby routines can schedule alarms to perform tasks at specific times. You may adjust or disable them from phone settings.
Users of devices running MIUI (Xiaomi and similar devices) The default system clock on MIUI devices is causing problems with the alarms. If you are using a device running MIUI do the following:
- Delete all alarms from the default clock application
- Download and install the Google clock app from Google Play
- Set your alarms using the Google clock app
Yes, if you have more than one locations you can change the location displayed on the widget by tapping the location hotspot (the location name on the widget). You can also add two or more widgets on your home screen and have them display the weather for different locations.
To do that you first have to enable the location hotspot on each of the widgets.
- Launch the app
- Go to Settings
- Select 'Widget settings'
- Select 'Shortcuts'
- Select the 'Enable location hotspot' if it is not selected
The problem is that the size of the time is too big to fit in the available space. You can either make the widget wider by resizing it (if there is more space available) or make the time smaller on the widget.
To make the time smaller do the following:
- Start the app
- Go to settings
- Choose Widget settings
- Choose Font size (time)
- Decrease the size of the time by 1 or 2
- Go back and check the widget (you may need to adjust again until the time looks good on the widget)
You can set your location manually by doing the following:
- Go to settings
- Select Weather & location settings
- Deselect the 'Use my location option'
- Click on the 'Select weather location' option and follow the instructions to search for and select your location.